Inhaltsverzeichnis
new, change, delete
This feature can be activated with the module Merchandise system.
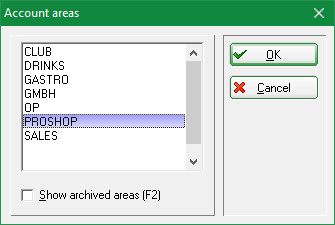
In order to work with the cash register you will have to select the account area first, e.g., PROSHOP or SALES.
To do so, click on the yellowish button in the icon bar.
or go to the menu Accounts/Select account area and select the required account area.
Entering suppliers
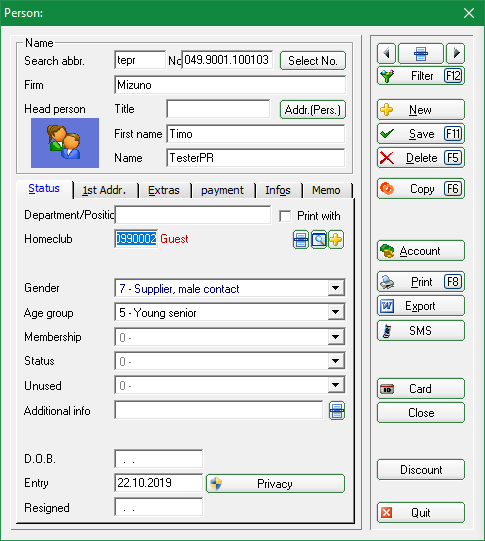
First of all begin by entering all suppliers – this is done in the same way as with people and companies via Persons/…New, change, delete. Firstly enter the gender „7 – Supplier, Contact person male“ or „8 – Supplier, Contact person female“. Apart from that, entering a supplier is almost the same as entering a company member.
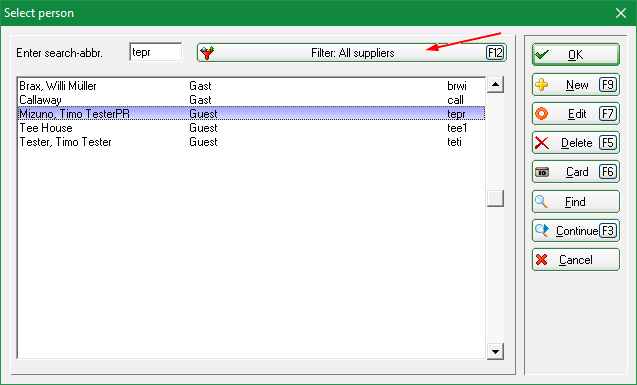
But it is important that you set the filter for the selection list from „Members and guests“ to „All suppliers“, so that only suppliers will be displayed.
Adding articles
Presetting
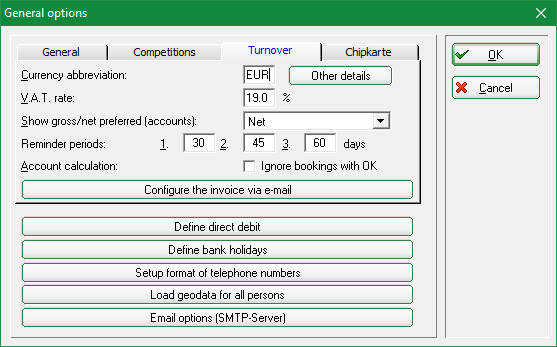
Before you start adding articles, check the correctness of the item's name and if the correct percentage rate for the „VAT rate“ has been set; to do this, go to Setup/Program options/Options and select the tab „Turnover“:
Click OK if the settings are correct. Otherwise adjust the entries an then click OK. In case you have articles with different VAT rates (e.g., 7%) you can set this for each article individually in the article's definition mask. PC CADDIE will remember the set rate and will only change it to another rate, for example 19%, when you create an article where you explicitly set this rate.
Entering articles
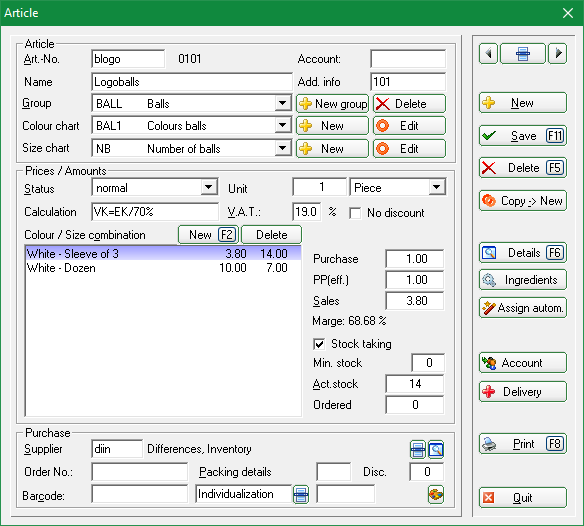
To create an article use the menu item Article/…new, edit, delete. This is where you can enter all your pro shop goods. To add a new item select New; to edit an existing article select Edit:
Article
Article no.
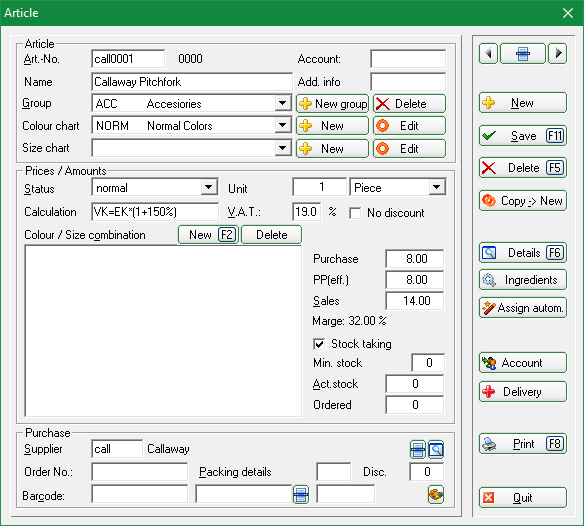
An article number can have up to 8 characters. You can use numbers or letters, but never mix up upper and lower cases. A conversion into bar codes only works with 8 digit combinations of letters and/or numbers (e.g.; logo0001, call0001, 66660001). Article numbers are usually chosen schematically. For instance, begin with the first letters of the product group/type or even of the supplier. Do not use special characters, especially dot („.“) for an article number. Here an example for a „Callaway pitchfork:“
To add an article within the same product group, it is quite useful to work with the „*“ or „+“. This will assign the next available article number: „call*“, or „call+“.
Account
You can enter the financial account number where the article should be recorded into this field. This is necessary for exporting the sales data to an accounting interface (additional module: Export accounting data)
Name
Select a suitable name for the article, e.g., „Callaway pitchfork“. However, this should be a short and distinct article name. Article names that are too long might not completely fit on a printed label. In your article list the product groups are listed in alphabetical order and within the product groups the articles are listed alphabetically.
Add. info
This is where you can enter individual information that can be useful on a label print or just to hold additional information for an article type. The delivery period is often entered in an encoded way, to determine possible discounts for closing sales.
This additional info stands for: Article delivery in January (=1) 2001(=01).
You can also filter by sales ID in the sales statistics. To do this, enter in the „Filtering“ tab in the „Booking text:“ field (second from the top) KENN: xyz. Enter your desired identifier instead of xyz.
HINT: The add. info ARTDET will cause the details of this article to be displayed separately on the daily balance (in the article statistic). This option is very useful if, for instance, the accounts department wants to see which voucher numbers have been sold or redeemed.
Group
This is where the product group is selected or created to which the article should be allocated. This entry should be well-thought-out as single articles or product groups can be used to create various statistics.
The daily turnover of the different product groups will be listed on the daily balance. Now a few examples for possible product groups:
- BALL = Balls
- BAGS = Golf bags
- ACC = Accessories
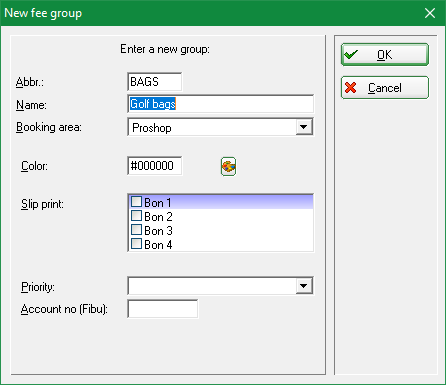
To create a new product group, click on the button New group:
For the product group „golf bags“, you can enter, for example, the group details „BAGS“ for Abbr and „Golf bags“ for Name. You also have to select the Account area (also see Edit accounting areas) and a suitable Colour. Click OK when you are satisfied with all the settings, and PC CADDIE will create the new article group. Select Delete to delete an existing group.

Colour chart
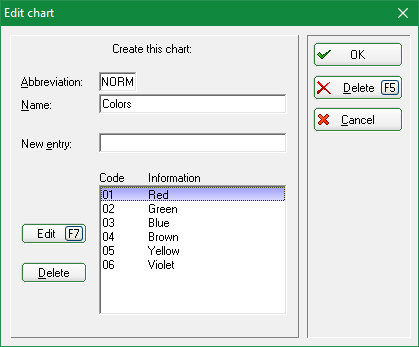
You can select individual colour charts for the articles or create new ones. By selecting a colour chart you will have the possibility to create sub articles. If you only require a main article you do not have to select a colour chart. The classic example is the standard colours. Select an existing colour chart from the list and adjust it if necessary with Edit.
Add a new colour in the row „New entry“ and confirm with OK. With Edit you can adjust the selected colour, it's short or long name. The Delete button on the left will delete single colours whereas the Delete (F5) button on the right will delete the whole colour chart.
Avoid useless colour charts as each article posting will open the selection list.
To create a new colour chart click New. Enter a short Abbreviation and then a suitable Name. Add the new colours you require one by one to the field New entry. Confirm with Enter or Add. The colours will be listed in the order from 01 -… Use Edit (F7) to adjust a selected colour, its abbreviation or long name. The Delete button on the left will delete single colours whereas the Delete (F5) button on the right will delete the whole colour chart.

Size chart
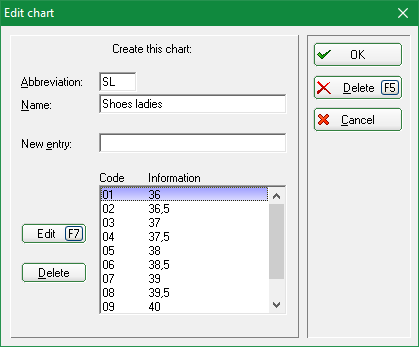
The size chart offers you another option for creating sub-articles. You do not have to select a size chart if you only require a main article. The combination colour/size chart will provide you with various colour and size possibilities for the pro shop articles. If you wish to use the size chart, you define it in the same way as the colour chart. Here an example for the size charts „Ladies shoes“:
Prices/Quantity/Status
Status
PC CADDIE provides the following selection options:
| Normal | This is for the usual single article. |
|---|---|
| Individual text | For an article „Misc.“ with a fix price but without a specific name. The query of the „name“ will appear when selecting the article. |
| Individual price | For articles without a fix price, e.g., a general article such as „Magazines“. The price query will appear when selecting this article. |
| Small (no label) | No label will be printed. But a list of small articles including bar codes for the cash register can be printed (ideal for smaller articles such as pitchforks, golf balls etc.). |
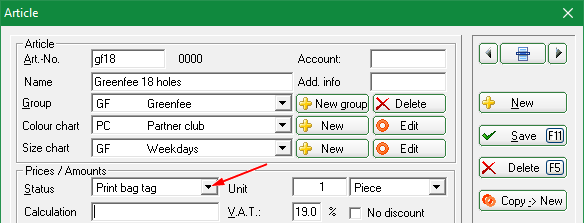
| Print bagtag | A previous set up bagtag will be printed when selecting this article, for instance for green fee, range fee, trolley or similar. |
| Voucher sale | This status has to be selected for a voucher sale (see Voucher administration). |
| Voucher redemption | This status has to be selected for a voucher redemption (see Voucher administration). |
| Cashbook | This is a specific status for cashbook articles (see Cash book). |
| Discount/surcharge | An article with this status and a sales price of 10,00 will add an extra charge of 10% to the total of all entered articles (e.g., percentage surcharge for credit card payments) |
| Reduction total | An article with this status and a sales price of 10,00 will post a discount article in the amount of 10% of the total price, meaning the sum of ALL selected articles |
| Reduction last article | An article with this status and a sales price of 10,00 will post a discount article in the amount of 10% of the latest selected article in the cash register (e.g., Member invitational green fee) |
| Change VAT | This status is only required for adjusting standard VAT rates (e.g., when a bottle of water is sold as a round refreshment and has a reduced VAT rate). |
| Hidden | This status is only for special articles and is usually set up by our PC CADDIE support team. |
| Payment method | For all payment methods such as cash, credit card, EC card, cheque etc. These will be listed separately in the daily balance. |
| Inactive | For all articles that are not being sold anymore but might be used again another time (seasonal articles such as sunscreen). It is still possible to print a sales statistic of these articles. Inactive articles can be moved to the suitable archive area when archiving them so they will not be visible. |
| Serial number management | This status is used for articles with serial numbers. |
Unit
PC CADDIE provides the following sales units:
- Piece
- Subscription
- Pack
- Meters
- Liter
- Kilogram
- Pair
- Set
- Dozen
- Hour
- Bottle
- Barrel
Calculation
Enter the required purchase and sales prices in the Proshop account area. The row for calculation can be left empty. The formula for the calculation is the outcome of the entered purchase price (net).
If you want to use the automatic calculation simply enter the numbers 1, 2 or 3 to the field Calculation and confirm with Tab.
The following formulas are behind this:
- 1 = VK=EK*(1+?%) –> Sales price=Purchase price* (1+?%)
- 2 = VK=EK+? –> Sales price=Purchase price+?
- 3 = VK=EK/?% –> Sales price=Purchase price/?%
The question marks have to be replaced with a number. The sales price (gross) will then be calculated automatically.
V.A.T.
The standard VAT rate that has been set (Setup/Program options/Options) will be used. For individual adjustments it is possible to change the VAT rate for specific articles.
No discount
If required, this option can be activated, for instance, for articles with a low margin. These articles will not be considered when discounting a sale.
Colour/Size combination
The colour/size combination allows you to create sub-articles.
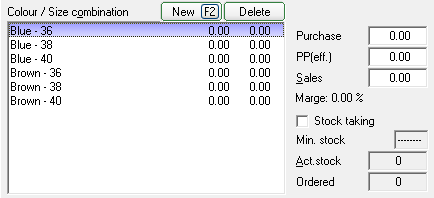
New or F2 opens the above selected charts:
and after selecting the options you will get these sub articles. By using the check mark for „Acc.“, „Abbr.“, „Status“, „Unit“, „VAT“ you can individually set these properties for the sub articles in the main article.
With Delete you can remove a single sub-article. But this will only work if the article has not been used/posted yet (incoming goods or sale).
The purchase and sales price will be generated according to the entered calculation. The effective purchase price (PP eff.) includes postage and/or packing as well as granted discount on the list price.
Minimum stock level, actual stock, ordered
The following fields activate automatically when ticking the Stock taking box.
Minimum stock level
If you reach the number that is entered you will get a warning when selling this article. If you do not want to manage the minimum stock level, enter „—-“.
Actual stock
The opening stock is set with the button Incoming. Further incoming goods can be added via the menu Articles/Incoming goods.
Ordered
This entry is only for informational purpose. Is does not accord to the number of articles that have been printed in an order list.
Purchase
In this section you can enter the purchase details. Select the supplier, enter the order number, packing unit and maybe even granted discounts.
In the Barcode field you can scan in the suppliers' bar code. Then you do not have print out labels, for instance, for golf ball sleeves.
Further options
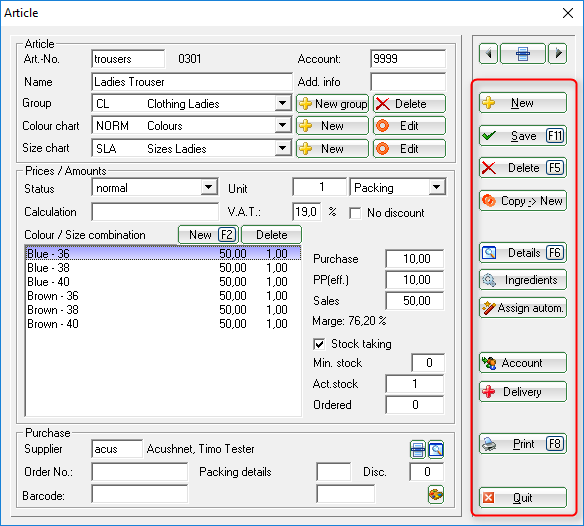
This window offers further input options using the buttons on the right hand side:
New Create a new article.
Save Save the settings of the article.
Delete Delete an article.

Copy → New Make a copy of the article.
Assign autom. Define a standard automatic article assignment for a specific group of people. This is rarely used by a pro shop but more interesting for green fee bookings Green fee article
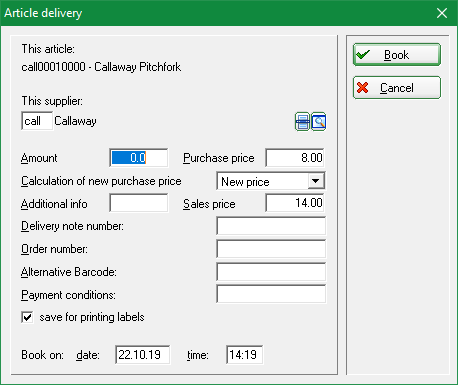
Delivery This button is used for the merchandise system and allows you to enter incoming goods.
The supplier will be entered according to the input in the article mask. After entering the amount of incoming goods and the purchase price you will have the following options:
- New price - the new purchase price will be defined as effective purchase price
- Average - the average of both purchase prices will be calculated and defined as effective purchase price
- Calculated - the calculation entered in the article mask will be used.
All further details concern the delivery note or conditions of delivery. If you do not wish to print a label, remove the check mark.
Components
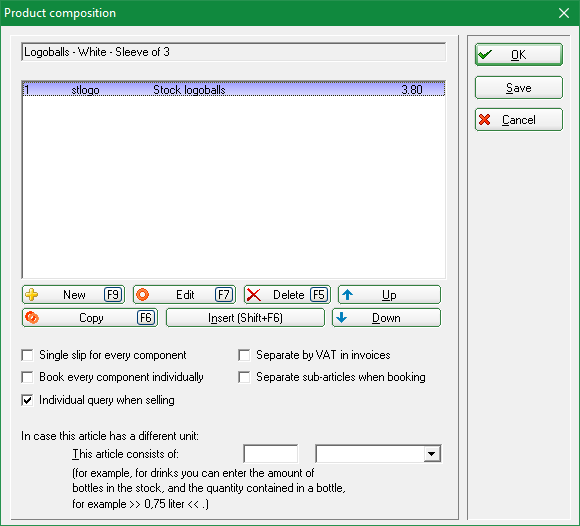
With this feature you can manage the inventory of your articles which you have in single units but sell in different packing units, e.g., golf balls. You will have to create two articles. One stock article with stock taking where you can purchase all kind of amounts, 500, 1000 or even 2500 pieces. For the sale article you have to define the different kind of sale units, e.g., 1, 3, 6, 12 pieces. Now you set the amount that should be subtracted from the stock article for each sale unit separately.
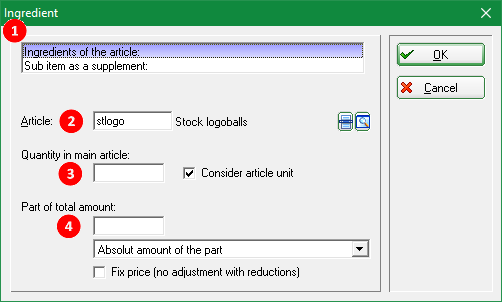
Use the button New to get to the mask where you can select and confirm the stock article.
- Leave the selection of „Components of article“.
- Select the stock article.
- Define the amount that will be subtracted from the stock article when sold.
- If you leave this field empty the sale price from the sold article will be used.
More information and setting options for the contents can be read here: sub-items.
Account
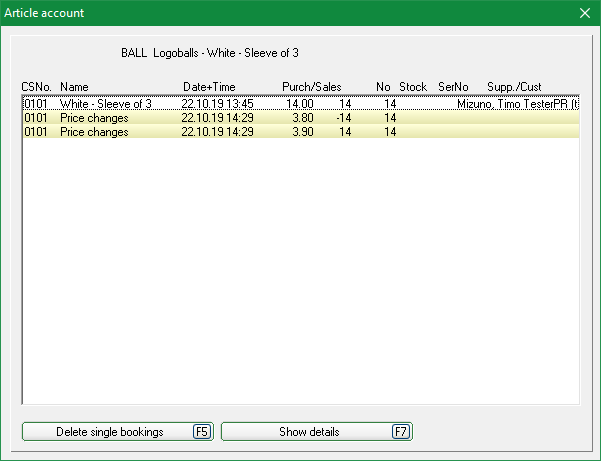
Click on Account and then on Show. You can then view all postings that have been recorded for this article up to the current day.
Print You get various print options.
End Close the article mask.
Configure quick selection
Read more about the Cash register - quick selection
Working with the PC CADDIE cash register
Read more here: Instructions for use of cash register.
Voucher administration
This feature helps you organize the sale and redemption of vouchers and keep an overview of the turnover, see Voucher administration.
Subscription administration 2.0 (Abos 2.0)
- The advantage of the subscription 2.0 is that a subscription is no longer managed in a person's account, but has its own database.
- It is very easy for the customer to print an evaluation of all his purchased and redeemed subscriptions.
- In addition, there is the possibility to limit the sold item to a specific date or period; for example, if the subscription is valid for 365 days, the credit not redeemed will expire.
- Also, the subscription 2.0 article is transferable - be it for the family of the customer or for a guest. All this is also in the overview, which you can print with name, date and time for the customer.
- If you want to limit a redemption, for example: redeemable 2x per week or month, this is now possible.
- Subscription administration 2.0 simplyfies the documentation work and and renders many excel lists unnecessary
Entering articles
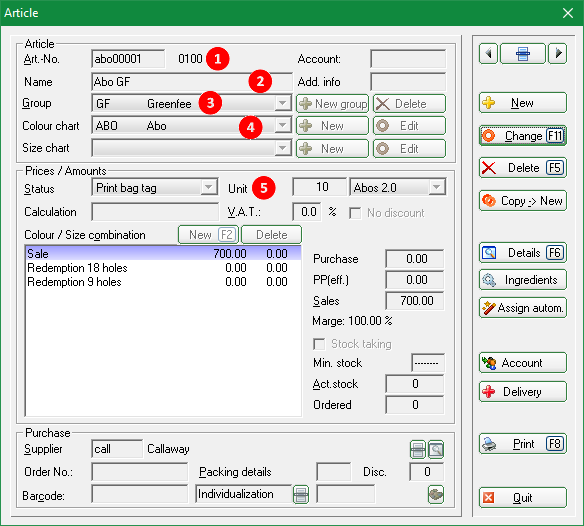
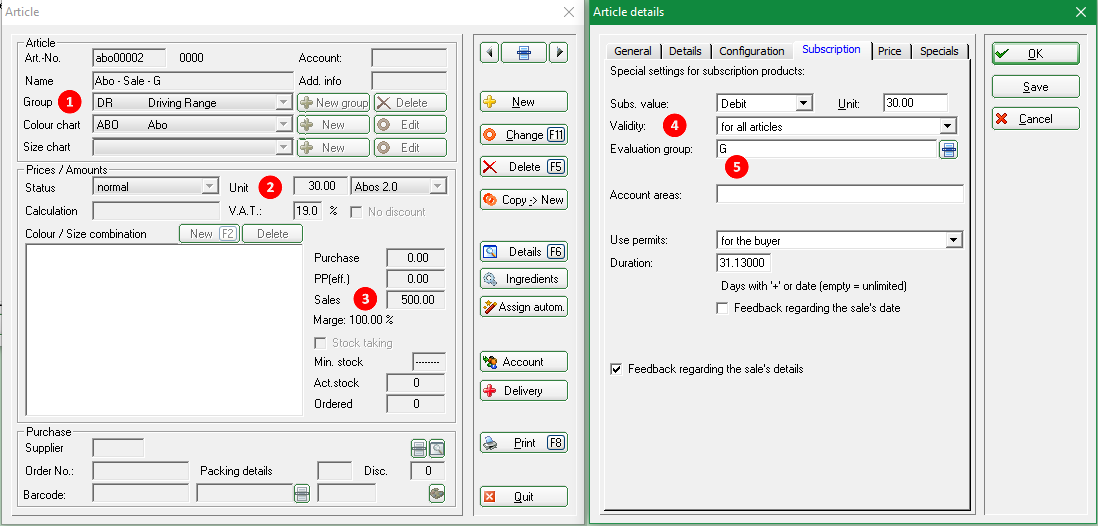
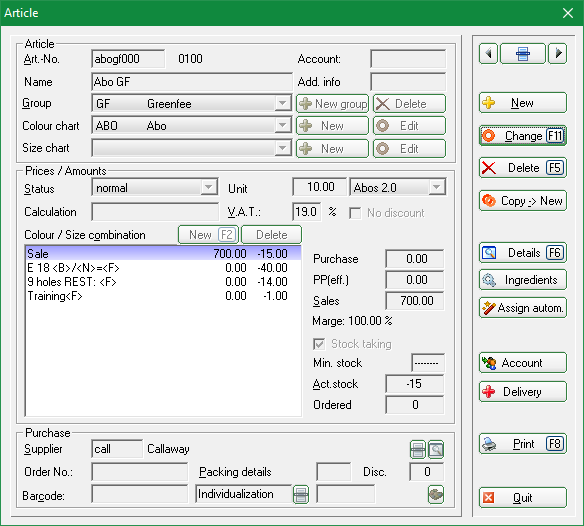
1. Article number
2. Name
3. Group
4. Colour/Size combination
5. Select unit and Abos 2.0 (new subscription management)
Important: unit at sale: for example, 10-card so 10th unit when redeemed: -1 or -0.5.
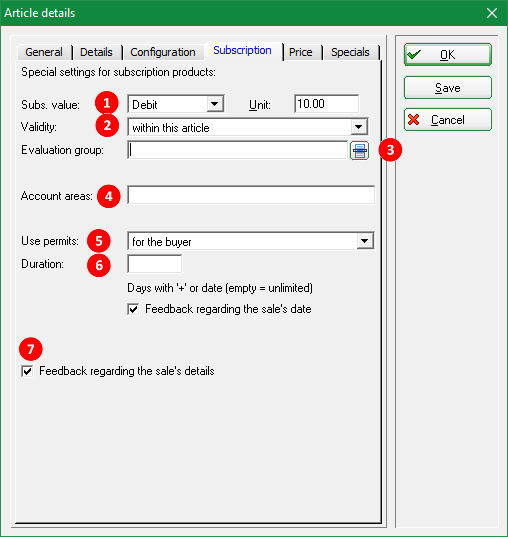
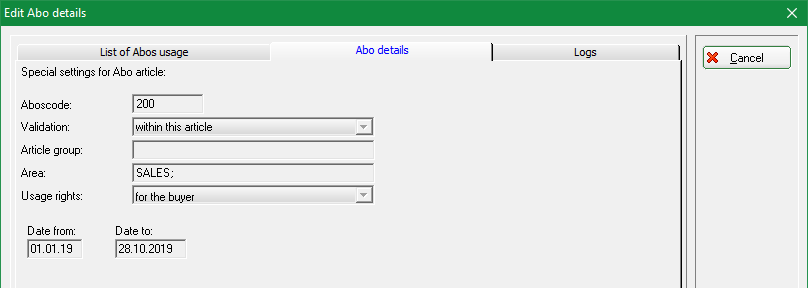
Further settings are available under Details
The main setting are used for both sale and for redemption.
Subscription sale
1. Subscription value:
Whether sale or redemption, is taken from the main article mask
2. Validity:
- for all articles (for example with different product groups)
3. Evaluation group - the common evaluation group must be entered here for different product groups. (Only displayed here with special function, otherwise under the tab „General“)
4. Account areas: can be redeemed in different account areas. (Only with special function - please contact support and only if evaluation group matches)
5. Use allowed:
- for the family of the buyer (families together)
- for everybody (for example, a member brings a guest and wants to take the GF from the subscription)
6. Valid until: validity of the subscription
7. Questions regarding the details at the sale.
When selling, the details created in the article are displayed. These cannot be changed.
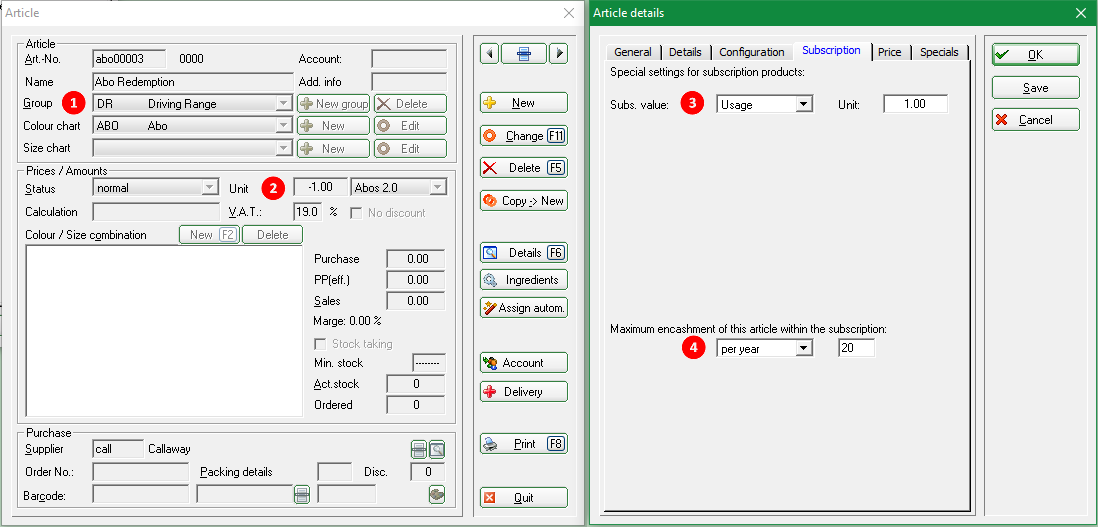
Subscription redemption
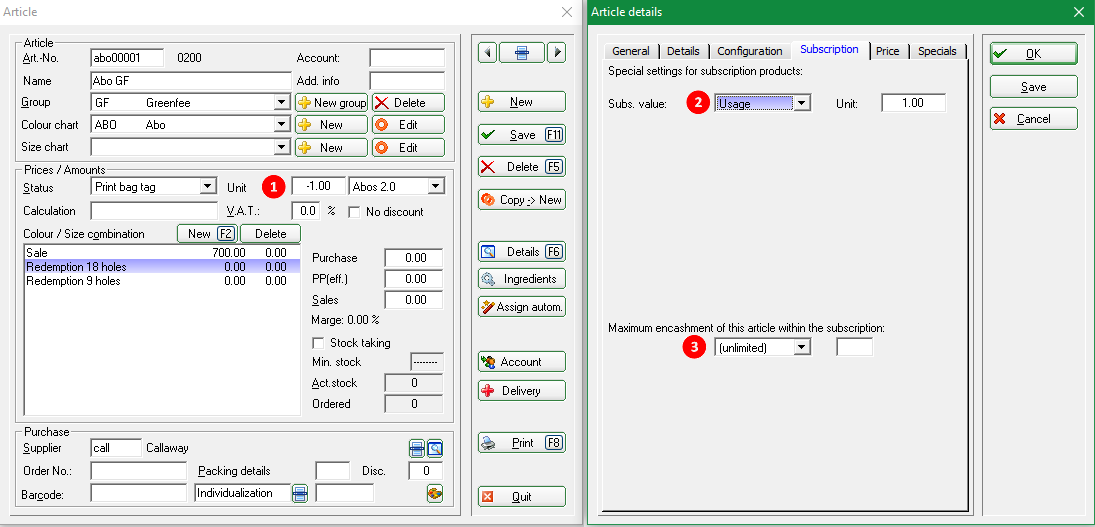
1. Negative units (such as -1 or -0.5) automatically cause the subscription details to be saved as a redemption.
2. Subscription value is taken from the main mask. Unit is converted to a positive number
3. Maximum number of redemptions of this item within the subscription:
Redemption in the cashier
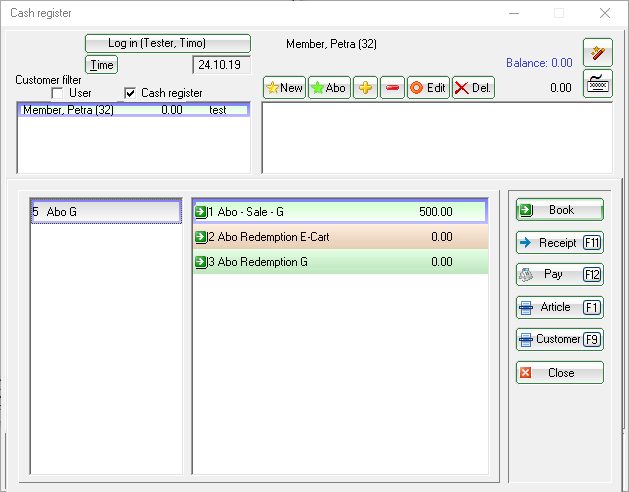
Open the person in the cash register and then enter the desired subscription item. It opens the overview of all member's subscriptions.
1. Abocode: subscription number
2. Person: who bought the subscription
3. Abo article name: the name of the article
4. Date until: validity
5. Available: remaining balance
Subscription example
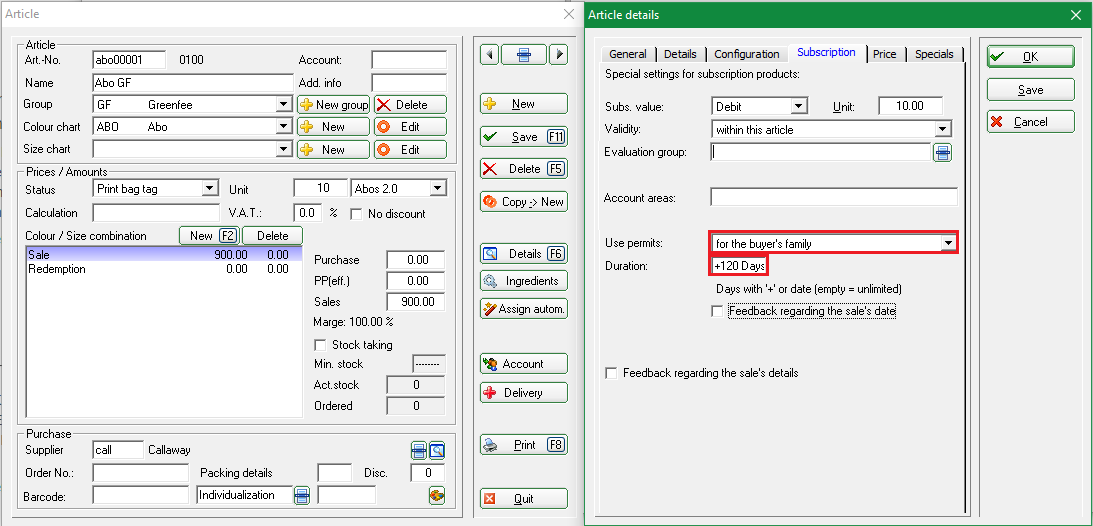
Subscription for the entire family
Select For family under Details. In this example, the validity is set for 120 days from the date of sale.
It is important that the families are correctly grouped together.
Subscription in different article groups
Example: Sales: Group Driving Range
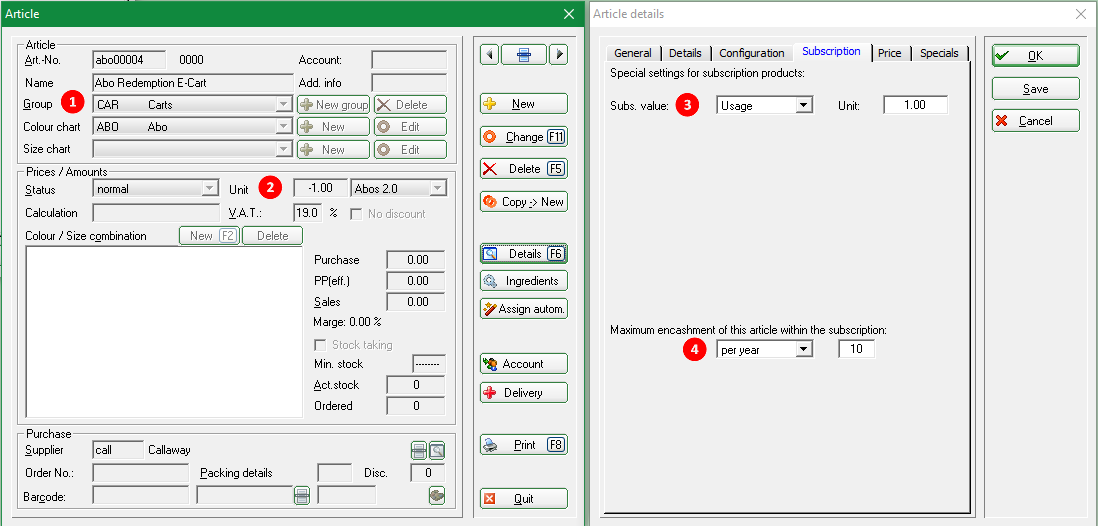
Redemption: Group Driving Range: 20 x Rangefee redemption Group Carts: 10 x E-Cart redemption
You have to create 3 articles. 1x sale with Group Driving Range, 1 x redemption with Group Driving Range and 1 x redemption with Group Carts
Sale items:
1. Group for sales articles
2. Select unit & Abos 2.0
3. Price
4. Validity „for all articles“
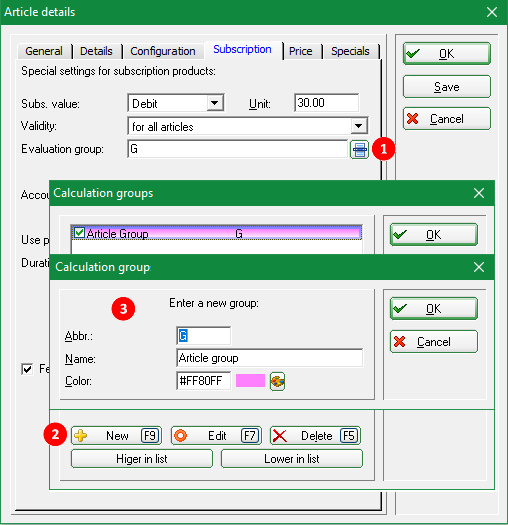
5. Evaluation group: Group
(1. Open list, 2. Button: NEW, 3. Name evaluation group)
Redemption article No. 1
1. Article group for redemption products
2. Unit
3. Subscription value - is automatically taken from the main article
4. Limitation: max. 20 times per year
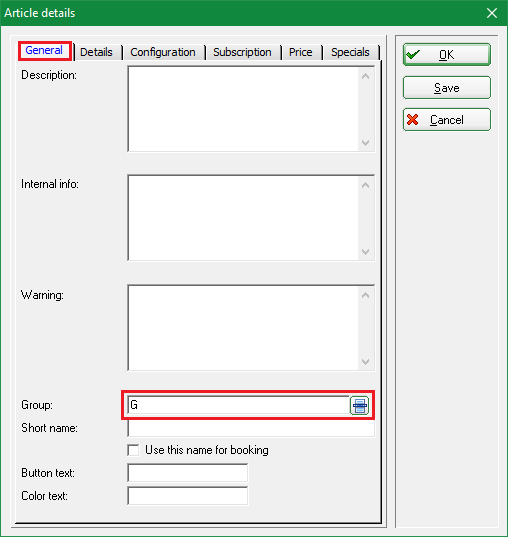
IMPORTANT: the evaluation group must also be filed in the redemption article in the „General“ tab
Redemption article No. 2
1. Article group for redemption products
2. Unit
3. Subscription value - is automatically taken from the main article
4. Limitation: max. 10 times per year
Important: enter the evaluation group under „General“ as with the first redemption article!
Practical tip: Create quick selection
Subscription with different redemptions
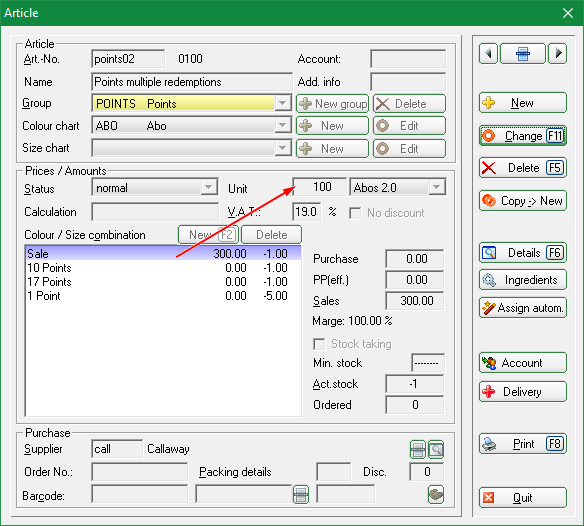
For example, Points system. Sale: 100 points à Euro 200.00. The guest can play both on weekends and during the week. Different points will be deducted, 15 points at the weekend, 10 during the week. The player can redeem balls worth 3 points for DR.
If there are only a few redemption variants (3 in this example), create the article as follows:
Sale articles
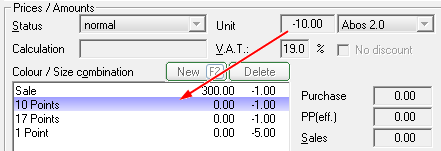
Redemption article - first variant:
Redemption 10 = -10 in the Unit field
Redemption 17 = -17 in the Unit field
Redemption 1 = -1 in the Unit field
Redemption article - second variant:
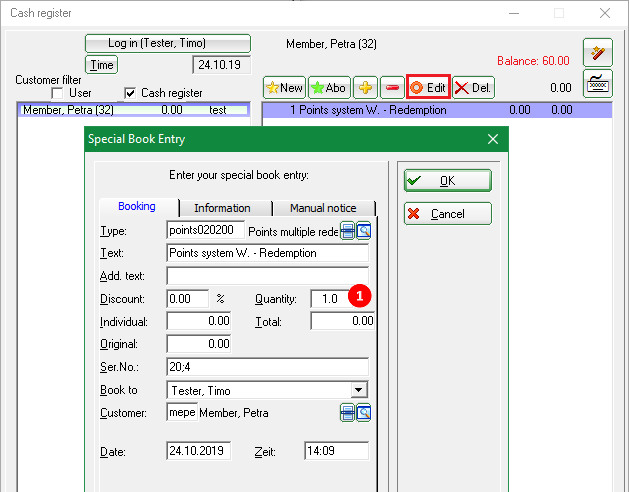
Only one redemption item with Unit -1 is created. The value can be adjusted the the desired value (1) in the cash register by pressing the  button. This is independent from the pointing system.
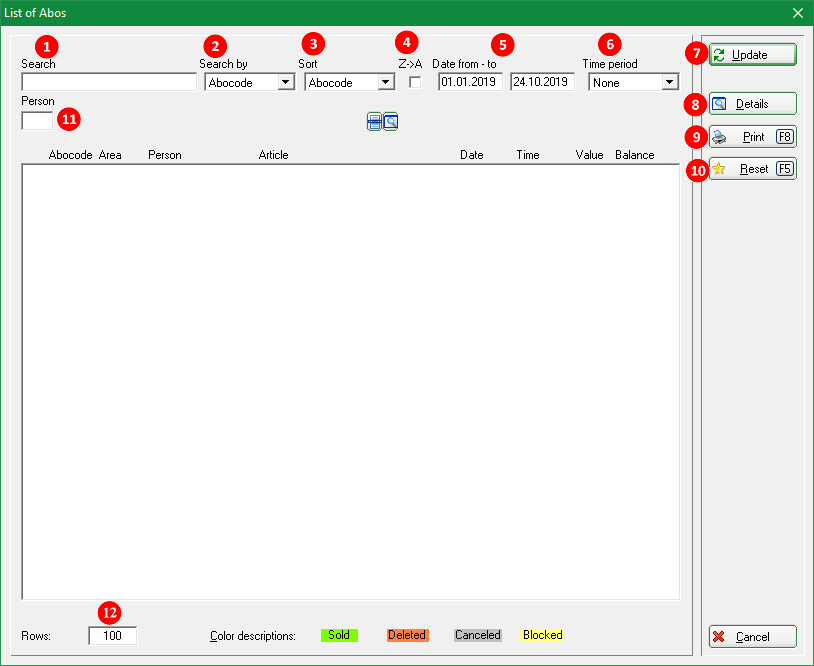
Subscription management overview
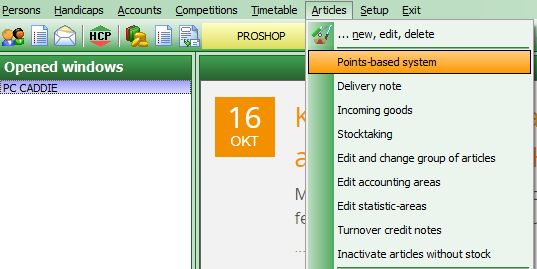
The overview can be found under the menu item:
1. Search: search for article date, abocode etc.
3. Z→A: invert order of display
5. Date: validity from-to
7. Update: update selection (also with Enter)
8. Details about a particular person / subscription
9. Print
10. Reset: reset all settings back to the original
11. Person: search for a person
12. Sum of how many lines are displayed (can be changed.) Attention, the higher the number is, the longer it takes.
Print the subscriptions
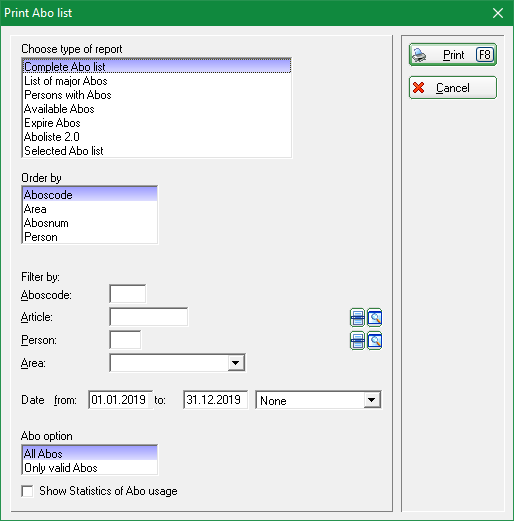
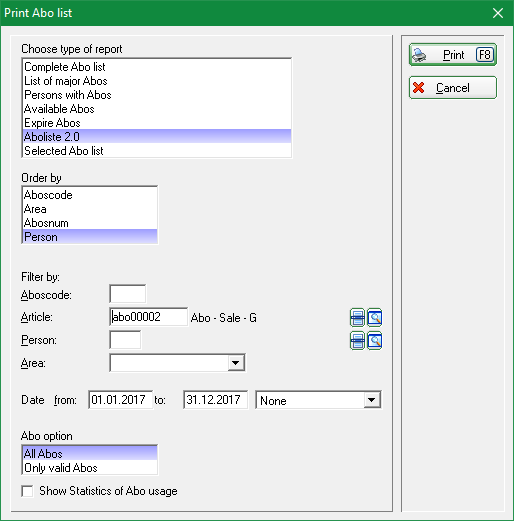
Here you can print different evaluations/views of the subscriptions.
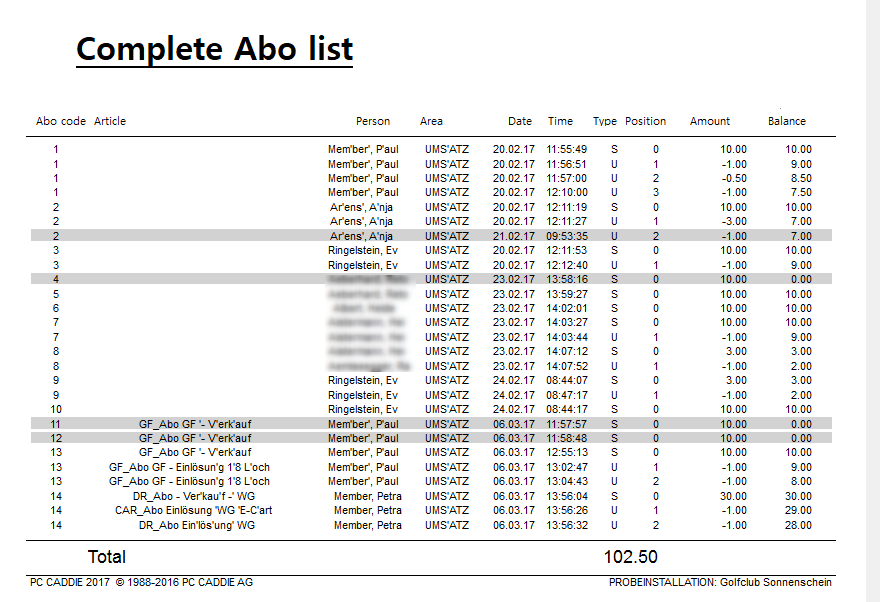
Example 1: Complete subscription list, 01.01.2017-31.12.17, All subscriptions
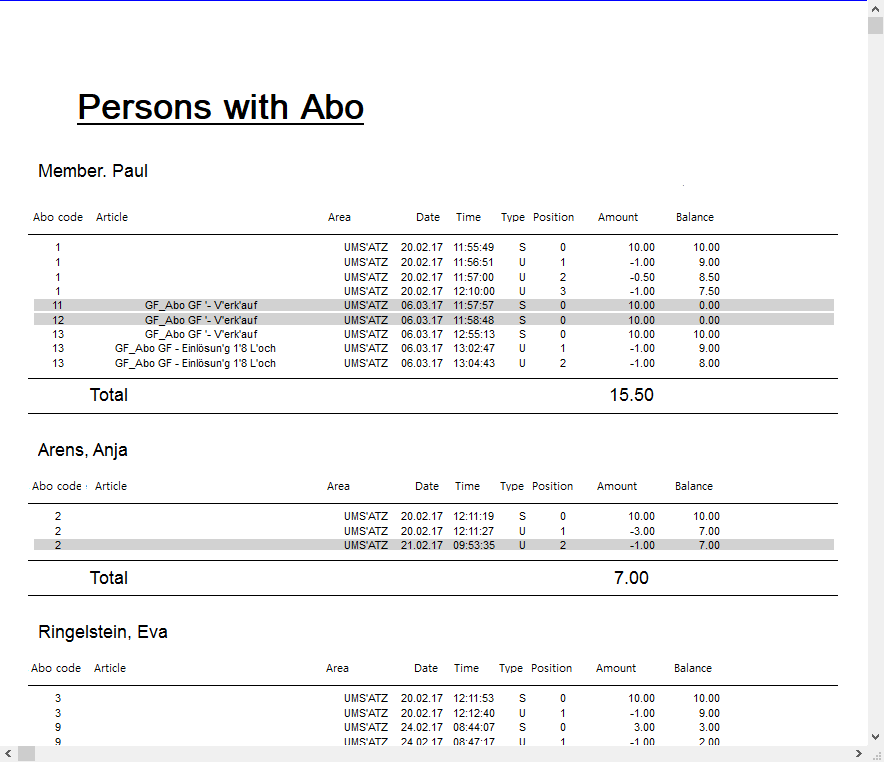
Example 2: Persons with subscriptions, 01.01.2017-31.12.2017, All subscriptions
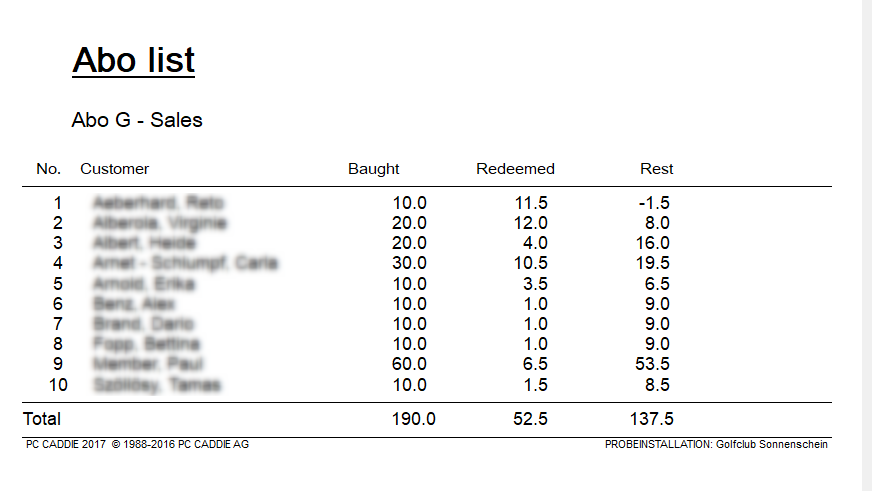
Example 3: Subscription list 2.0 = Subscription list
All persons with a selected article with initial stock / redemption & balance as of TODAY
Print subscription balance on receipt
If you want to print for your customers the remainder of the subscription with every receipt, this must be done as follows:
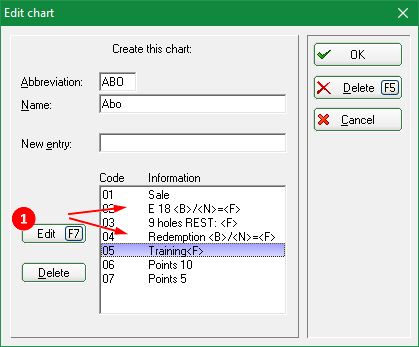
Complete the name under Color / Size combinations (1), in the article mask.
This is how the article looks like:
| B | Available stock or current balance. This is always adjusted |
|---|---|
| N | Unit which is deducted when redeeming |
| F | Remaining stock |
| E | Validity end date |
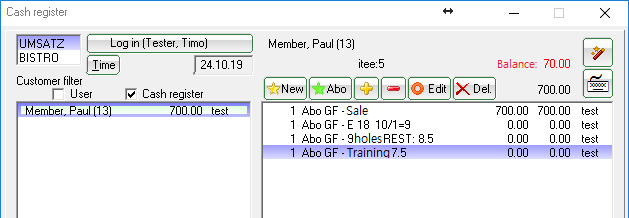
The view in the cash register:
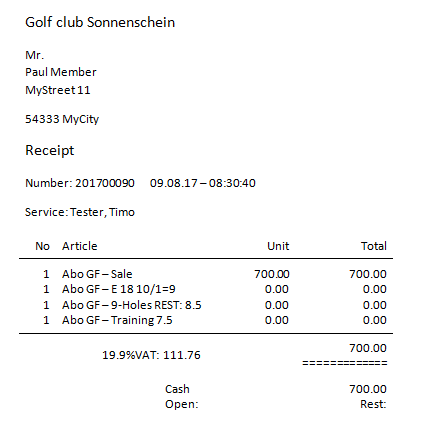
The receipt may look like this:
- Keine Schlagworte vergeben

